Germinating cannabis seeds is the first real “skill check” in your grow. Do it right, and you start with a strong seedling that’s ready to build roots, stalk, and leaves. Do it wrong and you can end up with a seed that never pops, or a tiny sprout that collapses before it even gets going.
Here’s the good news. Germination isn’t mysterious. It’s plant biology. A seed needs the right mix of moisture, warmth, oxygen, and a dark, stable space. Give it those inputs, and it usually does the rest.
What Germination Really Is
Germination is when a dormant seed “wakes up” and begins growing. Inside the seed coat is an embryo and stored energy. When the seed absorbs water, it activates enzymes, starts cellular growth, and pushes out the first root called the taproot.
That taproot matters more than anything in week one. It anchors the plant and starts pulling in water and minerals. Your main job is to protect it from three common threats: drowning (too wet), drying out (too dry), and damage (too much handling).
The 4 inputs that control everything
- Moisture: softens the shell and starts internal growth
- Warmth: keeps metabolic activity moving
- Oxygen: seeds breathe too, even before they sprout
- Darkness: mimics underground conditions and protects early roots
Mini takeaway: most “bad seeds” are actually “bad conditions.”
Germination Options: Pick Your System
Different growers swear by different methods. The best one is the method you can keep stable, clean, and consistent.
Option 1: Paper towel method
This is the classic “watch it happen” method.
How it works: Seeds sit between damp paper towels in a dark space.
Why growers like it: You can see the taproot and time your transfer.
Where it goes wrong: People over-soak the towels or damage the taproot during transfer.
Option 2: Direct sow method
This is the “hands off” method.
How it works: Plant the seed straight into a starter medium (light soil or a starter plug).
Why growers like it: Minimal handling and less risk of transplant shock.
Where it goes wrong: People dig it up to check, or keep the medium too wet.
Option 3: Glass-of-water soak
This is the “quick hydration” method.
How it works: Seeds soak in room-temperature water for a short window.
Why growers like it: Fast swelling and often quick cracking.
Where it goes wrong: Leaving seeds submerged too long can reduce oxygen and raise rot risk.
Mini takeaway: paper towel is great for visibility, direct sow is great for simplicity, soaking is great for a short jump-start, not a long bath.
Step-by-Step: A Clean, Repeatable Germination Workflow
This is a practical process you can follow regardless of which method you choose.
Step 1: Set up a stable environment
Aim for steady warmth and a protected, dark space. Sudden cold nights or hot windowsills slow germination and create uneven results.
Step 2: Keep everything clean
Wash your hands. Clean your tools. Early seeds and sprouts don’t have strong defences, so contamination can snowball fast.
Step 3: Add moisture the smart way
You want damp, not soaking. If you squeeze a paper towel and water drips out, it’s too wet. If the surface dries out and feels crisp, it’s too dry.
Step 4: Wait for the taproot
Most viable seeds pop in a few days, but timing varies. When the taproot appears, your goal shifts from “start germination” to “protect the root.”
Step 5: Transfer with minimum handling
If you’re moving a germinated seed, support it by the shell. Avoid touching the taproot. Place it into the medium with the root facing down and cover lightly.
Mini takeaway: once the taproot shows, slow down. That tiny root is the whole game.
Pro Tips That Actually Move the Needle
Don’t drown the seed
Seeds need oxygen. If your setup is waterlogged, the seed can’t respire properly and may rot. This is one of the most common beginner issues.
Don’t keep “checking”
Every time you open, move, poke, or peel, you change moisture, temperature, and air exposure. Let the seed do its job.
Use a starter medium with good airflow
Early roots like a medium that holds moisture but still allows air pockets. An overly compacted or constantly saturated medium is trouble.
Keep humidity gentle after sprouting
A slightly humid environment can help a new seedling avoid drying out. Just don’t trap stagnant air forever. Moist plus stagnant is where fungal problems thrive.
Common Myths That Waste Time
“More water makes it pop faster”
Reality: Too much water often slows things down and increases failure by cutting oxygen.
“If it’s not popped in 48 hours, it’s dead”
Reality: Some seeds take longer depending on age, storage, and conditions.
“You should crack the shell to help”
Reality: The shell protects the embryo. Forcing it open can damage the seed or create an infection point.
“The taproot can handle a little touching”
Reality: That root is soft, and even gentle pressure can bruise it.
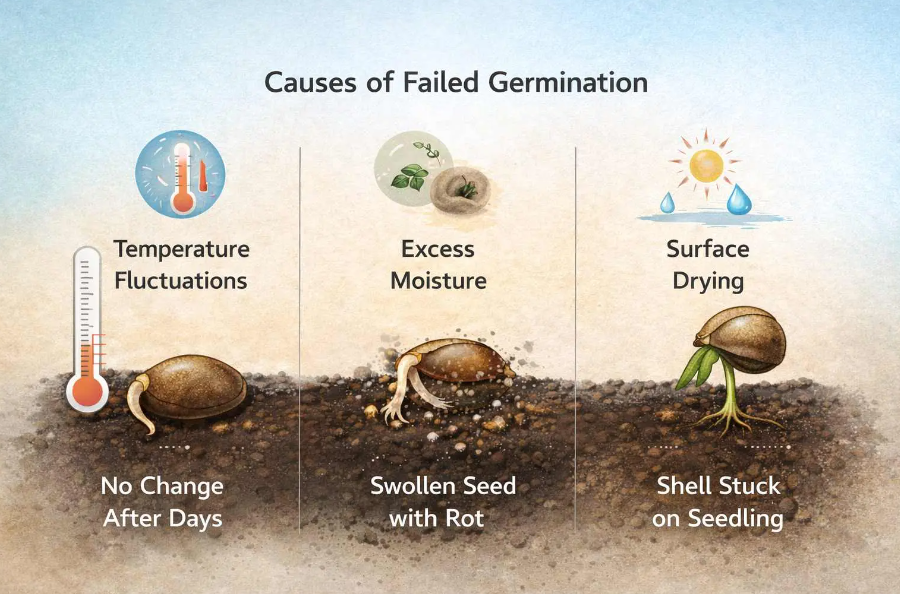
Troubleshooting: Fix Problems by Symptom
Symptom: No change after several days
Common causes include cool temps, inconsistent moisture, or low viability. A seed that never swells may not be absorbing enough moisture, or may not be viable.
Symptom: Seed swells, then turns soft or smells off
Usually too wet, not enough oxygen, and microbes take over. The fix is better moisture balance and cleaner handling, not more water.
Symptom: Shell stuck on the seedling
Often happens when the surface dries during emergence. Light misting can soften the shell so it slips off naturally. Pulling too hard can rip the tiny first leaves.
Symptom: Seedling stem collapses near the surface
This is often linked to overly wet conditions and poor airflow. Water less, improve airflow around the surface, and avoid keeping the top layer saturated.
Mini takeaway: most “mystery” issues are moisture + oxygen problems in disguise.
Does Seed Type Change Germination
People shop for different seed types for different reasons, but germination basics stay the same.
Feminized vs regular seeds
Germination needs don’t change. Moisture, warmth, oxygen, and darkness still run the show.
Autoflower vs photoperiod seeds
Same germination needs. The difference is what happens later in growth, not during sprouting. Where it matters early is planning. Many growers prefer minimal stress for autos because they move fast through early growth stages.
Mini takeaway: don’t overcomplicate germination based on seed type. Focus on the fundamentals.
FAQs
How long does germination take
Many seeds sprout within 1 to 5 days, but it can take longer depending on seed age, storage history, moisture stability, and temperature consistency.
What does a healthy taproot look like
Usually pale white to off-white and firm. If it looks dark, mushy, or slimy, that points to rot or contamination.
Do seeds need light to germinate
They tend to do best in darkness because it helps hold moisture steady and mimics natural underground conditions.
Should you soak seeds first
It’s optional. A short soak can help hydrate a dry seed, but long submersion can reduce oxygen and increase failure.
What’s the biggest beginner mistake
Overwatering and over-handling. A seed needs moisture, but it also needs air, and the taproot hates being messed with.
Conclusion
Germinating cannabis seeds is a simple system with a few non-negotiables. Keep conditions warm and stable. Keep moisture balanced so the seed can breathe. Keep it dark and protected. Then, once the taproot appears, handle it as little as possible. When you treat germination like a repeatable process instead of a guessing game, your starts get stronger, and your grow gets easier from day one.